I've reconditioned two swing keels so far. The first was for a Venture 22, the most recent my 1979 Catalina 25. Here's a description of how I did it:
Sandblast
Forget grinding down the rust as a viable permanent solution. It's a waste of time and effort. There's no way to grind down into all the pits, and any remaining rust will spread like cancer. Sandblasting is what works. After removing the keel from boat, I had it sandblasted to "bright" metal. This is so not fun that I cheerfully paid someone else to do it, even though I own a sandblaster and compressor. At this point, the surface of the cast iron looked like silver grey moonscape or volcanic rock.
Acid Treatment
As soon as I got the keel back from blasting, I etched it with hydrochloric acid (a.k.a. industrial strength toilet bowl cleaner - be carefull!) to remove the rust remaining in tiny pores, and the rapidly occuring surface oxidation. I then rinsed it with lots of water, followed by two applications of phosphoric acid (a.k.a. "Ospho"). After that was thoroughly dry, I used a nylon scrub brush to remove any dusty residue. At this point, the surface of the cast iron looked like black or charcoal grey moonscape or volcanic rock with a bit of a shine to it in some areas.
Keep a garden hose handy when working with strong acids. Don't let acid spills remain on concrete that you care about. Don't wear clothes that you care about for any of this work. Wear appropriate personal protective equipment, don't run with scissors, etc.
Initial Epoxy Coating
Next, I applied two coats of WEST epoxy. At this point, the surface of the cast iron looked like honey glazed black moonscape.
Once the process of applying epoxy begins, try not to go more than 24 hours between coats, so as to maintain a tight primary chemical bond between layers. If more time elapses, then wash with water, sand, and wash again with acetone before applying the next (delayed) coat.
Rough Fairing
Then I made up fairing putty from WEST with filler additives (WEST#407), and rough faired the keel. When I say "rough faired" here I mean the correct general shape, but with no special attention paid to tiny pits, scrapes, scratches or other minor imperfections in the surface finish. At this point, the surface of the keel looked sort of mottled, like camoflage paint applied by someone colorblind, or a rare skin disease.
Fiberglass Armor
After rough fairing, I wrapped the keel in two layers of 14oz. fiberglass cloth and WEST epoxy to protect it from misc. abrasion in the future. (If you skip this step, the barrier coat is much more easily breached by rough handling, crab traps where they don't belong, gentle groundings, or even brushing through enough shellfish clinging to weeds.)
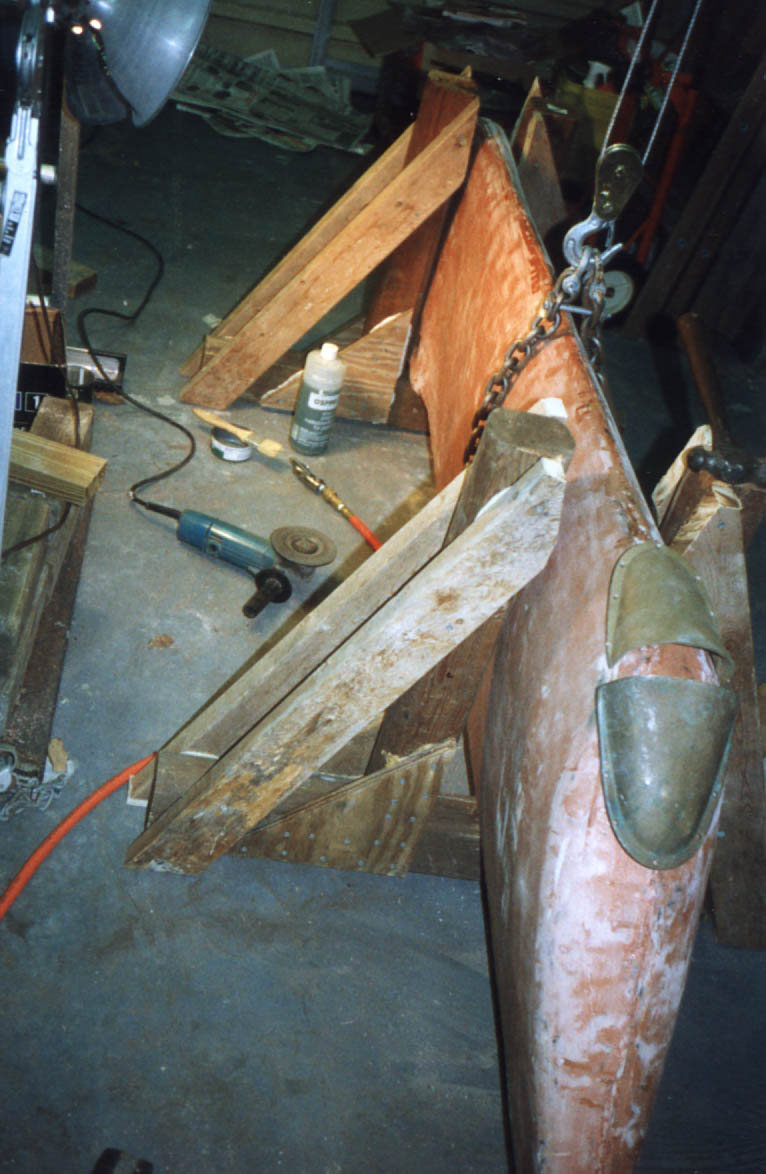
Grounding Shoe
Figure 1. Catalina 25 swing keel grounding shoe being fitted.
I also added a bronze shoe where the keel runs aground, and piled on several more layers of cloth and epoxy in that area, and along the leading edge. At this point, the surface of the keel had the texture of the woven fiberglass cloth.
Finish Fairing & More Epoxy
After lightly sanding the fuzz, stubble, and frayed edges of the cloth, I did another round of final fairing on top of the fiberglass (WEST#410), followed by several last coats of epoxy resin as a barrier, and to protect the fairing compound from future bottom sanding. By this point, the keel surface was smooth, and almost perfectly fair except for a slight bulge where the bronze shoe was buried under glass.
Bottom Paint
I then applied copolymer bottom paint (which should minimize the need for future bottom sanding).
Pivot Repair
I also repaired the swing keel pivot hole at the same time by installing a bronze bushing. (Described in more detail else where.)
Reinstallation
Finally, I reinstalled the keel under the boat in my driveway. (Described in more detail else where.)
Verifying Results
If there can be a good side to all this work, it's that if you do it right, you don't have to do it again. This was done several years, and a few haulouts ago. I have carefully inspected the results each time the boat is out of the water (and each time I get around to diving under it). The same goes for the Venture 22 keel I did all this to. In both cases, the only visible damage to the encapulation occured where the keel had been run aground. The damage stops as soon as it reaches the bronze shoe.
Minor Repairs
Where the water tight integrity of the sheathing was breached, rust and the resulting delamination began to spread under the epoxy and fiberglass, but only very slowly (maybe an inch or less per year in saltwater). It is easy to sand back the paint, grind back the damaged fiberglass, clean up the light rust, and reapply the encapsulation, as described above. I can't over emphasize how much the bronze shoe reduces the need for this sort of touch up repair.
If there can be a good side to all this work, it's that if you do it right, you don't have to do it again.