Repairing a Swing Keel Pivot Hole
Regarding the pivot bushing issue. I've repaired two damaged iron swing keel pivot holes, a Venture 22 and a Catalina 25.
On the Venture keel, I put a greased wooden dowel inside a thin-wall hard rubber sleeve (to keep it straight), taped the sleeve in position in the keel hole, and poured reinforced WEST epoxy resin around it. After the epoxy cured, I drove out the dowel, and left the sleeve in as a bushing. (That's a much lighter keel than a Catalina 25, and the head of the keel trunk is intended to provide more side thrust support.)
In the case of the Catalina 25 keel, I installed a bronze bushing (1"ID, 1-1/2" OD, 1/4" longer than keel thickness).
I got my C-25 bushing from the local marina that did the sandblasting, Banana River Marine Service, Merritt Island, Florida. I'd expect that any bearing house would have catalogs of bushings to choose from. There's not neccessarily one correct bushing. Rather, you'll need to evaluate the condition or your keel's pivot hole after sandblasting to determine what outside diameter bushing you need, and are prepared to enlarge the keel hole enough for.
Obviously, if you can't find exactly the bushing you're looking for, get one with too much metal, and have it machined down to fit. Worst case, a chunk cut from the end of a really big damaged bronze prop shaft out of a motor yacht could easily be machined to fit on a lathe. I had a machinist set the pin-to-bushing clearance at about 0.025" to 0.030".
The original 1.0" hole in my C-25 keel was worn and rusted in a jagged hourglass shape, just under 1.5" at the waist, and around 2.0" at the widest. A local powerboat marina assured me they could bore it out and bush it in their machine shop, no problem. Well, that didn't go as planned. When I went to pick up the keel, the hole looked like it had been augered out using a monster hand-held drill motor, no doubt bucking and screeching the whole way through. The hole was not straight or aligned. It was however about large enough for the bushing they handed me.
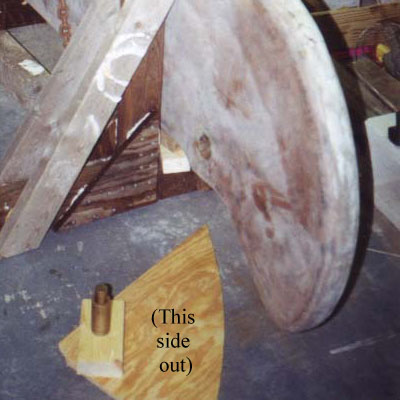
Figure 2. Catalina 25 swing keel pivot repair bushing with wooden alignment jig.
After the flat sided head area of the keel was faired, I used that surface as an alignment reference. Using a hand-held die grinder (heavy duty version of a Dremel), I ground the narrow center area of the hole into alignment. That was the only area where the bushing touched the walls of the worn hole. I made up a wooden alignment jig (using scrap plywood & 2x4 bored in a drillpress) to hold the pivot pin and bushing straight in the hole. After roughing up the outside of the bushing and the inside of the hole, I cast the bushing in place with WEST epoxy reinforced with powdered aluminum and milled fiberglass lint. I used duct tape dams to form pouring funnels, and to contain the epoxy while it hardened.
After the C-25 keel was installed in the hull, I measured the alignment. At a point 7 feet from the pivot, it was within +/-3/16" of dead straight in the keel trunk. I was grinning. As of this writing, the repair has been in service for over 10 years. Everytime I've inspected it, the bushing and surrounding epoxy look as solid as when I first installed them.